Volkswagen Passat Forum banner

2.8L V6 '99 Passat Cylinders 1,2,3 (Bank 1) Misfires

12K views 26 replies 5 participants last post by  AndreasPassat  
#1 ·
Hello everyone,
Let me start with promising that I've searched the entire forum for related information and could not find a solution.
2.8 V6 '99 Passat, AHA engine with 170k miles.

The problem started about a month ago when my CEL started flashing. After I read the codes they were P0300, P0301, P0302, P0303.
Car hesitates on idle, drives smooth and I do not experience any power loss. Check engine light has not been flashing until I fired it up today after it sat on my driveway over the weekend. But the code has been persistent and never went away. CEL will flash for 10 seconds and stay consistent.
Things I have done:
1. Changed spark plugs with BKR6EKUB, even though the old ones looked fine.
2. New NGK wires
3. New MAF sensor
4. New vacuum lines
5. Ran through 2 bottles of injector cleaner (not Techron, i believe it was some cheap stuff from Autozone called Lucas)
6. Serviced PCV with new hoses.

Any help is much appreciated!
Thank you
 
#3 ·
Do not start the car again. Remove the passenger side valve cover. Rotate the engine to TDC manually (socket on the crank bolt is best). Check the timing chain to see if the marks line up. I expect the chain tensioner pads have broken or the tensioner has failed the chain skipped. Running the engine can cause the chain to skip another tooth and bend the valves.
 
#4 ·
I agree with PZ! Do not start or even crank the engine until cam drive and timing have been thoroughly checked/corrected.
After you have made sure that the valve drive and timing is correct, do a compression test on all cylinders.
 
#6 · (Edited)
Started the car back up, no CEL flashing. But the misfire was still there.
5 minutes later oil pressure light came on. Pulled valve covers. Dropped the oil pan. The pickup screen was clogged with plastic pieces, that I believe are CCT pads (or a pad). https://ibb.co/k7hQ2v
There was also bunch of black RTV that the previous owner (or mechanic) decided to slap on there instead of the gasket.
Question 1: In the video included, are wobbly CCTs normal? I only had misfires on bank 1 (passenger), but the driver's side wobbles just as much.
Question 2: Should I buy new CCT unit? Or two of them? Or can I just find replacement pads? (Found somewhere in here that you can replace those pads). Here's a link for them: http://www.ebay.com/itm/VW-Audi-1-8T-2-7-2-7T-2-8-3-2-4-2-Timing-Cam-Chain-Tensioner-Adjuster-Pads-Chain-/252722802567?fits=Year%3A1999%7CModel%3APassat&hash=item3ad773ef87:g:9dcAAOSwjDZYeLBx&vxp=mtr#rwid
Here's what my CCTs look like on both banks in case you didn't watch the video:
https://ibb.co/jUvL2v
https://ibb.co/jAOnFF

Thank you everyone! Hoping to get on the road asap.
 
#7 ·
You have just experienced exactly what happened to my 98 GLS V6.
By looks of those heads in the pictures, the valve train has been starved of oil for a period of time. Plus the fact that oil hasn't been changed nearly as often as it should have been. The right bank is just absolutely horrible. Conventional engine oil was obviously used way over the oil change interval and burned. That is what causes the severe dark brown and black colors on the engine components.

Side note:
Not doubting you on the AHA designation of your motor, but...
AHA motors have oil feed tubes that connect all the cam caps together. Those look like ATQ heads.
However, I have never personally been inside of a 99 motor, so there might be some design changes that I am unaware of during that model year.
AHA is drive by cable - ATQ is drive by wire.
In the end for this particular discussion whether it's AHA or ATQ really doesn't matter.


Here is what I would do - for whatever it's worth.
Pull the cams out and inspect the bearing journals of the cams. Make sure that the cam journals are not all scarred up.
Pull BOTH of the CCT's out and replace them. There are more places supplying CCT's now so relatively good deals can be found. Ballpark figure will be about $300 for each CCT. (for genuine VW/Audi)
Also, as long as your in this far, replace all of the cam seals.
New CCT gaskets (thin metal piece) MUST be used when re-installing CCT's.

Remove all plastic bits and pieces from the oil pick tube screen. Use a tweezers if necessary. Don't let any plastic bits remain on the screen. They can get sucked up and lodged in the micro fine screens on the CCT and cause failure of the CCT.
Flush out the oil pan to remove any particles of whatever is laying in there. I would also get yourself the proper gasket for the lower oil pan.

Upon re-assembly of everything, I would do a Sea-Foam treatment in the engine. Fill with a new cheap conventional engine oil, add Sea-Foam and run at idle for 30 minutes to an hour. Drain out oil, change filter to desired type and switch over to synthetic motor oil.
 
#8 · (Edited)
0W-40 Mobil One used every 4k, that's the sad part :( I have had oil lights pop up in the past, but they would disappear after couple seconds. Now I pay the price for the look of the heads.

I know that the passenger's side can be removed without removing the TB, can the driver's side be done the same way since the CCT in front?
My problem side was passenger's.. Misfiring on all 3 cylinders. No other codes. Do you think I could just use a new CCT on Passenger's side? Or do they both look bad to you?
 
#9 · (Edited)
0W-40 Mobil One used every 4k, that's the sad part :( I have had oil lights pop up in the past, but they would disappear after couple seconds. Now I pay the price for the look of the heads.

I know that the passenger's side can be removed without removing the TB, can the driver's side be done the same way since the CCT in front?
Yes it can be done

My problem side was passenger's.. Misfiring on all 3 cylinders. No other codes. Do you think I could just use a new CCT on Passenger's side? Or do they both look bad to you?
Looks don't mean much. You have to actually see how the CCT functions (during engine running or continuous rotation by some means) to determine by looking at it. But if your on the cheap, yes you can do that way.

Physically check the cam chain on the drivers side, if the chain feels somewhat taught then the CCT is probably ok. If there is any slack in the chain what-so-ever, that is not a good situation.
Yes the CCT is pumped up hydraulically with engine oil after start up, but the first few seconds before the oil gets to the CCT, the cam chain is kept taught by (1) internal spring. If those springs are weak, the chain can jump teeth on the cam gears causing all kinds of mayhem.
 
#10 ·
Thank you so much for your input.
CCT coming from ECS got delayed and will be here tomorrow.
I'm gonna try to clean up the sludge with purple power degreaser tonight. Hoping to get this thing running before the weekend hits!
 
#11 ·
I'm gonna try to clean up the sludge with purple power degreaser tonight.
That's all good, just make sure you rinse the Purple Power cleaner off as much as possible, either with water or some other cleaning agent that doesn't attack the aluminum.
If left unrinsed, Purple Power may pit the aluminum and cause some corrosion.
I would use a degreaser such as CRC Brake Kleen to rinse of the Purple Power.


These pictures are extreme, only because the cleaning solvent / agent I use is industrial strength and it's also heated up to 125 degrees, but it still is water based with citrus additives.

Here is a before shot of one my heads on the last rebuild I did, using my cleaning solvent / agent.

Image


Here is the same head after cleaning. Notice all the white fuzzy speckles, that was the cleaning agent attacking the aluminum. I had to dip the heads in HOT water and brush off all the residue.

Image
 
#13 ·
I know I shouldn't have run it.. It was an emergency. Something I had to do and yes I remember how much I didn't want to.
Don't want you to feel like you're wasting your time. I really need to get this car back running.

Put the engine in TDC tonight, the marks didn't quite line up on bank 1. Bank 2 is perfect spot on.
The left cam's arrow is poiting directly to a mark, while the right cam's is off by a tooth or a little more.
Here are the pictures. Please, someone, guide me what do I do next.
Once again no timing codes before dissasembly.
https://ibb.co/gHc0LF
https://ibb.co/jOe2Za
https://ibb.co/cqQn0F
 
#15 ·
Found Tomvw's post somewhere on here.
Can you just confirm that this is what I do to correct the timing?
Do I have to remove TB doing this? Or can I just fit cam bar over it?

Disconnect negative battery cable.
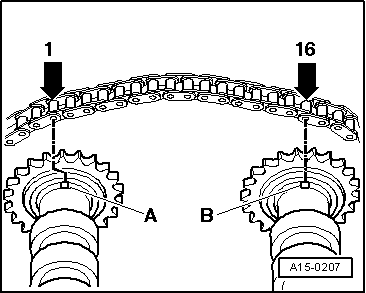
After setting the crank to 30-60 degrees before TDC. Install the cams and set them to the timing marks with the chain fitted correctly. (16 roller count see diagram)
You can fit the cam pulley holding plates to the exhaust cams, and use the cam locking bar to turn the cams.

After all 4 cams are correctly aligned to the timing marks as in photo, and the chains are correct.
Fit the cam locking bar and then turn the crank clockwise to TDC and fit the crank lock pin, then fit the timing belt etc.

Check this thread (This is bank 2) to see how easy it is to get the timing wrong with the bar installed http://www.passatworld.com/forums/68-b5-garage/387417-30v-v6-cam-chain-16-links-take-look.html
P.S. I respect every single member of this forum and appreciate any information that they can share with me so I can get this over with.
Please do not feel that I'm putting "bad taste in their mouths".
 
#16 ·
It's just a question of "Is starting the engine worth the chance of destroying it". Sadly, I have seen plenty that have failed and bent valves. Since the CCT is collapsed, the timing does not look to be as far off as the marks indicate. It's tough to see exactly, but it looks like it is only 1 link off. The next turn of the key could cost $2000, so please, do not start the engine again.

If the timing belt is properly aligned (the exhaust cam is at TDC), you can do the work without removing the timing belt. For me, it's easier to remove the intake cam, the last exhaust cam bearing cap and (if needed) drop the combi valve out of the way by removing 2 of the 3 bolts. Then swap in the new CCT after cleaning everything. You may find more of the bottom CCT shoe inside the head. You will need to allow the lifters to bleed down (overnight is great, but a few hours should work) after the cam is installed. Then change the CCT pads on the other bank.

The driver's side CCT is a pain to remove as it will hit the rear timing belt cover. You can loosen the cover by removing the 3-10mm bolts holding it in place and loosening the last 2 nuts on the water pump (they are a hassle). I have used a 10mm wrench to do them, but they are tough to reach with the timing belt in place.

If this makes you too nervous, remove the timing belt, use the cam/crank locks at Tom noted in his post.
 
#20 ·
With cam lock bar fitted, both exhaust cams line up perfectly. Bank 2 intake is spot on, bank 1 is off due to collapsed bottom pads of CCT, as mentioned earlier. What I'm doing next is
remove the intake cam, the last exhaust cam bearing cap and (if needed) drop the combi valve out of the way by removing 2 of the 3 bolts. Then swap in the new CCT after cleaning everything & allow the lifters to bleed down (overnight is great, but a few hours should work) after the cam is installed. Then change the CCT pads on the other bank.
Will I need to move my intake cam prior installing bearing cups counter-clockwise to correct timing, or will a new CCT take care of it? Do I remove it completely or just loosen the caps?
Also, with my cam bar fitted and exhaust cams spot on.. My crank marks do not line up. The notch on the pulley is literally on the other side on the pulley (180 degrees). If I do line up the marks, then the cam sprockets face up, instead of sideways towards each other. I'm pretty confident that the camshaft pulley is installed improperly. Is that something that I should be worried about?

Hoping to finish up on this Sunday. Thank you everyone for help!
 
#18 ·
Glad to help. It's good to know your own comfort level when working on a car. While some of us are confident ripping into anything, many more have never even worked on a car until they bought a Passat.

What part of Ohio are you in? I have family near Columbus and my son travels to Cincinnati at least once a month from Pittsburgh. Sadly, he has little mechanical skills, but he plays a mean drum, marimba and timpani :)
 
#19 ·
I'm from Moscow, Russia but currently live in Columbus, going to school down here.
I have done a TB on exact same engine as mine with my brother on his A4 Quattro. Getting to TB won't be a problem.. But in his case, the timing was not messed up. We locked cams and just slipped a new one on. In my case, the timing does need corrected and it is a "different animal for me".
So from what I'm understanding, before putting everything back together my crankshaft has to be at TDC, exhaust and intake cams at TDC with 16 links counted in between on both banks. Correct me if I'm wrong!
 
#22 ·
Here's update with pictures. Took me over 3 hrs to take bearing cams off, messed up couple T30 heads, had to beat one with a chisel.
Took me couple more hours to figure out how put new CCT in.. After everything lined up bolted bearing cups and realized that my cam moved a bit and marks didn't line up anymore (cup -> cam). Took the CCT out again.. Took me another hour to put that thing back. Bolted the caps and ended up off again. Whenever you bolt the cam it rotates as you torque the bolts down... 3 am and I gave up. To be continued..

https://ibb.co/dxjqPa
https://ibb.co/mSXzHv
https://ibb.co/mcOjja
 
#23 · (Edited)
Correct chain timing for 1.8 and V6 banks 1 & 2.

NOTE:
Haynes incorrectly says and shows "16 rollers between timing marks"
After some research, I have discovered that some of this wiki.ross-tech info is also incorrect,
the V6 Bank 1 timing is the same as the 1.8; NOT as shown in the diagram.
See the images at the bottom of this page: 16730/P0346 - Ross-Tech Wiki


1.8 and V6 BANK 1. (Note one timing mark lines up between teeth, the other on a tooth. See pic.)
Image


V6 Bank 2 Correct timing. (Note the tips of the teeth that align with the timing notches are painted orange) View attachment 22825
Image
 
#27 ·
Same here, glad to hear you got it going and all is well. Curious to know how it got to the point it was at though, seems a bit of a mystery that the crank pulley was a complete 1/2 revolution off.