Volkswagen Passat Forum banner

My frankenswap thread

12K views 76 replies 17 participants last post by  Lz253  
#1 ·
Hi Guys & Gals, been collecting parts and finally about ready to pull the trigger (hopefully this coming weekend). here's where I'm coming from:

02 1.8t tiptronic
K04
GIAC tune
3" MAF
2.5" FMIC
TT 380cc injectors
4" custom cold air intake using factory airbox & "Colorado outlaw" style mod, but with fiberglassed collector scoop down by the right fog light
3" turbo-back exhaust with high flow cat

and here's where I plan to be the first time I fire it up next week:

02 1.8t 5 speed (I bought a wrecked but running/driving 5spd to make sure I wouldn't be missing any parts when the time comes)
Frankenturbo F21L
550cc injectors
Maestro
Manual boost controller (for insurance)
Quaife LSD courtesy of Mike VanGelder
South Bend Stage 3 clutch & 20lb flywheel
camber adjustable upper suspension arms


One of the things I'm still trying to figure out (and could really use opinions on) are,

A/F ratio & boost gauges. I personally prefer to be more subtle than having all kinds of extra pods & gauges around the cabin. Has anybody used one of these before, or any other dynotune products? https://www.dynotunenitrous.com/store/scripts/prodView.asp?idproduct=357 I was thinking about installing that in the front ashtray so I could lift the lid when I wanted to monitor things and close it when I don't.

and here are some pictures of her before she goes under the knife (The black B5.5 - wifey gets to drive the B6):

http://i38.photobucket.com/albums/e112/downeygr/DSCF2350.jpg

http://i38.photobucket.com/albums/e112/downeygr/DSCF2350.jpg

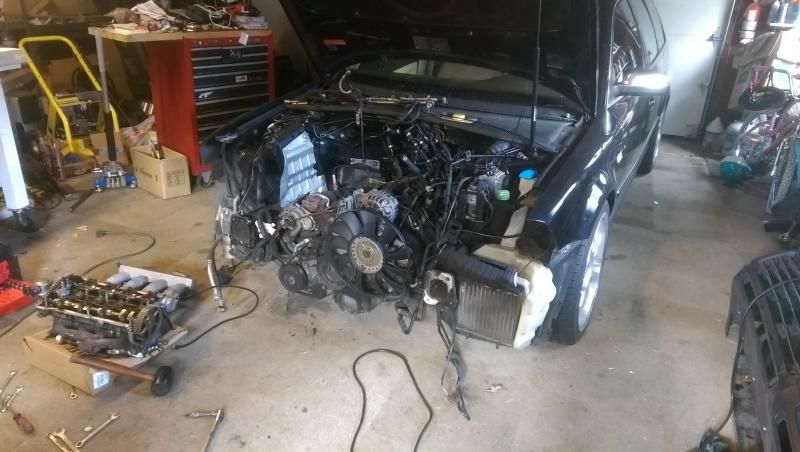
and here's a sneak peek at some of the goodies she'll be wearing when I wake her back up again:

http://i38.photobucket.com/albums/e112/downeygr/DSCF2351.jpg

I haven't gotten this involved in an engine bay for probably 20 years but I'm super pumped to finally be making enough money again that I can get back into it. Would love some helpful thoughts & comments on anything other folks have run into before with MT conversions?

thanks!
 
#3 ·
Thanks for the well-wishes! Can't wait to get started.

I've heard great things about both of those brands/applications too. I'm open to dial-style gauges if they don't have to sit out on the column or pillar. Does anybody have a more subtle place they've mounted their gauges before? My thinking is that I don't really feel like making my interior look more race-car like, and technically the only reasons I need access to that information is for troubleshooting and tuning. Is there a reason I'd want to monitor these stats in real-time all the time?
 
#4 ·
You might want to consider something from PLX. They started out making wide band A/F meters, but they branched out and make a blue tooth monitor that goes into your OBD 2 port. You can download or live log all engine information to an i-phone or android with their app. I'd think it would be very useful debugging because you can log all the engine data as well as get acceleration/GPS speed information from the phone. Once you are done with getting the air/fuel/spark tables the way you like them, remove the OBD port transmitter and you only have a boost gauge. I use a New South Performance gauge, BTW, mounted on the steering column instead of the a-pillar.
 
#6 ·
Prosport makes some baller gauges too. I had a new south performance gauge pod and it fit like crap, but it seems that's the only company that makes a steering column gauge pod. I can't put gauge pods on my A-pillar because I have air bags there, and plus putting it there looks kinda tacky anyway. I've seen people stick boost gauges in their air vents, too.. which is pretty cool. I would just get a single din 3 gauge slot. That's what I plan on getting when I pull the trigger on my GTRS elim kit. Aside from Boost and A/F, I would look at oil temp, oil pressure, and EGT. If you got a dual gauge steering pod and a 3 gauge slot that would more or less cover all your bases.
 
#10 ·
Nice gauge setup! I'm starting to wish I hadn't gone double-DIN now. Went ahead and ordered my LC-2 air/fuel controller yesterday with the standard round dyno-tune gauge but still leaning towards that dual digital gauge setup for a display and mounting it somewhere subtle. it is only 3.25"W x .8"D x2.3" tall. Any ideas?

thanks for the note too re: milling down the crank, that's the # 1 reason I bought a complete running donor car - so I would already have a complete engine/trans/subframe all ready to swap in and minimize downtime. I'm super behind now though after a crazy workweek so I may not get to do the actual swap for another weekend or two. I still have to get the diff, clutch & turbo/manifold installed, as well as change the timing belt, water pump and pop the oil pan off to check for sludge on this new-to-me engine that I didn't get any records with.

On the fun tool front though, I just got back from scoring a plasma cutter off craigslist tonight. Been wanting one of those for years. It's a hobbyist version but more than capable enough for my needs!
 
#11 ·
Alright Guys, just encountered my first surprise. Got the oil pan off today and it was totally sludge-free, but I would almost swear there's a sensor in the bottom of my current oil pan (car is not here right now) and on this one there is none. isn't there a 3-prong plug that goes down to the bottom of the oil pan? This new pan has a stamped spot and three bolt holes where I thought that sensor was supposed to be. Am I remembering correctly, and what does that sensor do if so? thank you for the help!
 
#13 ·
Interesting. My 02 tip does and my 02 MT donor doesn't. It seems logical though that if I'm swapping in the MT ECU & cluster along with the engine/trans that I probably won't need to worry about getting the low oil buzzer every time I start the car?
 
#14 ·
FYI what I ended up doing was buying a new level sensor ($35) and drilling the pan out with a 2 1/2" hole saw, lightly die-grinding the hole larger to fit (the sensor is about 2.6" diameter) tapping the screw holes to 6mm and buying 3 Allen screws from the hardware store.

Today's progress:

- removed the oil pan & oil cooler/filter housing looking for signs of sludge. Cleaned everything out.

- solved the problem of no oil level sensor via the previous paragraph.

- All the aluminum bolt-ons have been removed, painted & reinstalled. Couldn't find a very realistic looking one-pass aluminum paint but I found that if I lightly fogged over it with satin nickel after a coat or two of aluminum it actually looks like real aluminum. I'm pretty pleased with it anyway. The aluminum paint just makes the stuff look too, well, painted. I want it to look like brand new OE.

- exhaust manifold & turbo bolted down. I totally recommend getting some of those 10mm/8mm nuts in order to get the manifold bolted down to the head. No way in the world are you going to get the stock 12mm nuts on there. I was surprised to find that the turbo didn't come with any manifold-to-turbo bolts so I had to buy some. I couldn't find any that were exactly the length I needed so I bought some that were a little too long, ground them down and cleaned up the ends with a thread cutter. I also had to take a scrap 10mm open end/box wrench and bend the box end to about a 30 degree angle. Then you can slip the wrench over the nut and turn it by using a crescent wrench to get things adequately torqued down.

I'm pretty pleased with how things are going so far, though I was hoping to be this far along by Thursday - not today. Got too busy at work though so didn't have time during the week to get all this prep work done.
 
#15 ·
Almost completely done with the engine now. Just going a little OCD with making things look good - cleaning, painting etc. I'm glad I did though because when I took off the metal breather tube going from the back of the head down to the turbo inlet pipe (paralleling the head on the passenger side) to paint it, I found that it was COMPLETELY clogged with coagulated oil. I blew a good quarter cup of crap out of that 3/4" diameter pipe. Now it's all clean on the inside and nice and pretty on the outside too. in other news and events, all the pieces I need to install my diff arrived over the weekend so I'll be working on that by mid-week too. Mondays in my business are pretty much a 6:30AM-10PM operation so I won't get anything new done today but hopefully by tomorrow or Weds I'll have some more time freed up to get back at it.
 
#17 ·
Hey Guys, a couple of quick questions to help with today's agenda -

- what should I torque the diff bolts to? The Bentley doesn't cover trans internals.

- I also can't find anything in the Bentley about greasing the needle bearing in the end of the crank? Does anybody have a favorite grease for that application?

Thanks! I'm so close to being done I can hardly sleep at night. Just need to get the trans re-assembled and bolted back up to the engine and finish replacing the vacuum lines/check valves (just seems like a good preventative idea that's a lot easier to do while everything's still out of the car).
 
#18 ·
I got a reply from Mike Van Gelder last night - here are the specs for the bolts. Can anybody still answer re: the needle bearing?

The ring gear bolts are torque-to-yield bolts- specs are 60Nm and then an extra 45 degrees (1/8 turn) on each. the trans case bolts are 25Nm.
 
#19 ·
Hey Guys - just wanted to update on my current progress so far. I actually located an extremely good deal on the pistons, rods and crank I need to kick this thing up to 2.0L so I totally couldn't pass it up. This is what I wanted to do all along but I couldn't justify the cost until I found these deals. I feel like a kid waiting for Christmas to come now! Everything is in the mail.

Also, after talking to my neighbor who is an ASE-certified tech for a Ford dealership - I went ahead and took my trans into a transmission shop for assembly. I didn't know going into this that I would need tools to compensate for backlash, centering the diff, etc. That will probably lay me back by a few hundred bucks but I'll let you know once I pick it up (hopefully tomorrow). Beats the cost of doing it wrong in my opinion. I've done a lot of figure-it-out-for-yourself engine work over the years and most of the time I end up getting it right but this is one of those things I totally don't want to have to re-do any day soon.

have a great PM everyone.
 
#20 ·
Good job taking it to the pros. Just as with any diff, you need to make sure the gear lash is spot on.
 
#21 ·
Thanks. That's what the forum is for in my opinion - saving each other from doing something stupid. :) Shop was supposed to have it done Friday but didn't quite make it. In the meantime, I got my dynotune dual digital gauge installed this weekend. Here's what I decided to do with it:


Color isn't exact but pretty close to the stock MFD. I also swapped the cluster, ECU and lock cylinders from my donor car so I could finally have two keys + valet key again and started to play around with Maestro a little.
 
#22 ·
Well, I was really digging the location of the dynotune gauge from an aesthetic perspective but yesterday I popped my GIAC ECU back in it and went out for a quick drive to test things out and I discovered that the sun glare makes it really tough to read. Might have to find a different location after all. The gauge setup is super responsive though and is working exactly as they assured me it would. I'm very pleased with it so far.
 
#24 ·
Thanks! I'm super pumped too. Just wish stuff would take as long as it was supposed to, and no more. Trans was supposed to be done last week, and rods were supposed to be here Monday. Really wanting to get this all ready to go by labor day weekend but starting to wonder if I'm going to make it. All the machine shops I've talked to are a week and a half to two weeks out. In the meantime I've just been taking care of piddly stuff like replacing the garbage band clamps on my exhaust system with flange/clamp style. Could never get the stupid band clamps to quit leaking. But I guess that's the difference between a $7 solution and a $30 one. Lesson learned.

btw, where do you live in the 'Couve? my profile still says Portland but we moved up here in 2007. Right off Hwy 14 & Lieser Rd.
 
#25 ·
Well, I'll admit I'm blown away by how long it takes to get good work done. I guess it bodes well that they must know what they're doing to be this busy but I dropped my trans off on 7/29 and just was finally able to pick it up again yesterday. Took them five solid weeks to get the diff in for me. Sounds like that's about par for the course though to get someone who knows how to do it.

I'm still waiting on my engine internals to be balanced and block bored too. I was originally quoted a week and a half on that and it's been more than two now. Both shops were recommended to me by folks I know and trust a lot though so I'm just taking it with a grain of salt and tempering my enthusiasm to get started with the peaceful feeling that comes from knowing I'm in very good hands and I will never have to wonder if it was done right. I love this car and want to be able to drive it another 100,000 miles, not 10,000.
 
#26 ·
The key is always patience. I would rather wait and have a car that i know will be reliable, than do it quickly, but always be scared that somebody cut a big corner somewhere. I can't wait to see this thing when it's done. I'm planning on getting a frankenturbo kit for my car, so I'm curious as to what kind of power it's gonna make. The LSD should also make it a joy to drive. I hope I can build my car like this some day. Keep up the good work :thumbup: :wrench:
 
#27 · (Edited)
Thanks Man! Appreciate it. I can't wait to drive it either.

Finally got my block, crank, pistons etc back from the machine shop all bored, balanced & ready for assembly. So far all I've had time to do is start getting the rings gapped. using a constant of .005" per Mahle's recommendations for the first ring, I get a gap of .016331. All my top rings are spot-on just slightly larger than .016. Confused a little about their recommendation for the 2nd ring though. They recommend a .004" constant for the 2nd ring on the sheet that came with the rings, which yields a gap of .013. I've always thought the 2nd ring was supposed to be gapped using a constant of about .0005" larger than the top ring (i.e. .018 for an 83mm piston) so I called them. They said their recommendation of a .004" constant was right for the 2nd ring on a NA engine but they would recommend making it a little larger for 15lbs or more of boost. Weird. Anybody else install Mahle pistons and have an opinion on this? I think I'm going to call them one more time just to be sure, now that I've had time to do some more youtube and google research after I called them the first time.

On another note, the engine currently in my car has a head gasket that's been getting progressively worse. I was hoping to get my new engine all built and ready to go so I could just swap it in and not have to deal with the blown head gasket but after an entire summer of waiting for my engine/trans pieces to come back and borrowing the wife's car whenever I need to go somewhere (I work from home) I decided this weekend I'm going to just go ahead and get the head gasket done. Of course, that also means swapping the frankenturbo in is like 15-20 mins more of work by the time I've got the head off so I'm going to go ahead and put that on too. At least I can start enjoying some of all these goodies that've been accumulating in my garage for the last 3 months. :)

Here's a pic of things in their current state -

Image


The idea is that after I get the new engine swapped in I'll find another donor car with a thrown timing belt and swap this engine in, and resell it to recoup some of the cost of this project. So the head gasket isn't completely a lost cause. I'm in it for more than $8,300 so far, less the $2,600-ish I've already sold off the crashed donor car I bought for the engine/trans.
 
#29 ·
I'm kind of relieved that the head gasket went when it did actually - gave me a chance to build a little confidence on what most of us would consider to be a fairly major tear-apart repair. I'm just a hobbyist and this will definitely be the biggest mechanical job I've ever taken on.

Appreciate all the encouragement! Going to call tomorrow and confirm my ring gaps, then hopefully have some time this weekend to start putting the bottom end together.
 
#30 ·
Okay Guys, Project Haulin'-Ass Grocery-Getter is finally underway. I officially started assembly on the bottom end yesterday and just finished up this morning. Keeping in mind please that I'm a newbie engine builder, I've run into a couple technical questions that I'd like to confirm with some more knowledgeable minds than my own please before I finish torqueing everything down and walk away.

1) the rod bearings I received were tang-less, as are the OE rods, but my replacement rods have tang notches. I lined the bearings up visually using the rifle hole as my reference and installed them to 15 ft-lbs, but before I finish torqueing and move on to the oil pump will someone please confirm if there's any reason these bearings won't work or if I should indeed pull them out and go find ones with tangs?

2) I bought the rods used. They came with ARP bolts. Everything I've read says ARP hardware can be reused, but I'd feel better if someone would please confirm? I also need to know if the torque specs are the same as factory bolts, and what type of grease I'm supposed to coat the threads with before I torque them down?

3) I replaced the main bolts with new OE VW. Bentley says to just torque away but wanted to make sure the experts aren't also greasing those threads before they torque them down?

Thanks much! I'll keep searching the forums looking for these answers but so far I haven't figured out how to find this info.

Greg
 
#32 ·
I don't know about the tangs in the rods.

I've reused ARP hardware on mains and rods, though I was not building a race motor. There is assembly lube from ARP that makes the torque reading consistent, and their web page has the torque specifications for their products. I don't think it is a lot different from the factory specs, but the bolt stretch may be different between factory and ARP hardware, especially if the factory bolts are the torque to yield style.

For the mains, you may want to coat the threads with engine oil.

Other than that, it sounds like you're on your way.
 
#31 ·
spent some more time on Google after I got back from family stuff this afternoon and answered my questions.

1) Sounds like tangs don't matter aside from locating the bearing laterally. It is held in place from spinning by crush pressure.

1) ARP2000 bolts require 55lbs torque as measured with their ultra-torque lube. Just bought some on ebay.

3) Just do what the Bentley says.

looks like I'll be waiting a few days for my ultra-torque to get here before I can go again.

thanks,

Greg
 
#34 ·
Wow great job so far, i know i could not take on a task like this, so kuddos to you bro. I do not know much of anything on your questions above, but from what i saw before in older post and from a friend rebuilt, reusing old/used hardware was not recommended, but i could be wrong, since they are coming from APR, it could be different then stock ones. Good luck with the rest, i'll definitly be checking out the progress :thumbup: