Volkswagen Passat Forum banner

Another look at the dreaded wet footwell.

66K views 31 replies 21 participants last post by  matsvw  
#1 ·
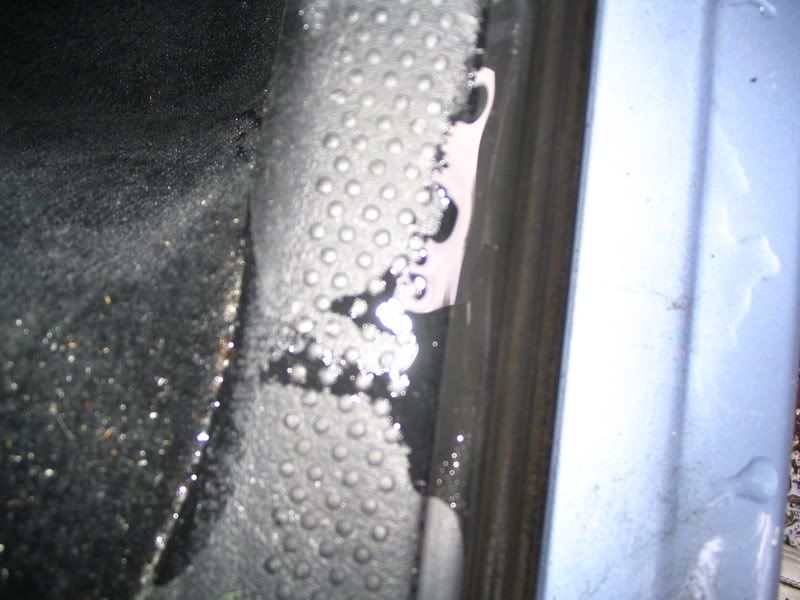
After reading many threads I thought I would offer another view on the flooded footwell. From the advice of these forums I had gone through the routine of making sure the drains are clear and the cabin filter is installed correctly. several months ago after some heavy rain left my footweel soaked I decided to look into this a little more. I rigged a small water line (icemaker hose) and begun to apply water to the various culprits mentioned previously. Never did I see any evidence of water intrusion from the sunroof or battery drain. I had suspected it may come in through the rear door as after I would wash and wax I noticed a small amount of water near the door. I removed the panel and while laying inside had my girlfriend spray the outside of the door with water. not heavy blast just enough like a heavy rain. I discovered as the door is designed to leak into the inside and drain out the bottom. I noticed water was seeping from the inner door panel into the inside of the car.
Image

Image

My conclusion was the inner door seal was probably ok from the factory, but after having the door look module replaced the gasket does not seal back as well. I picked up some foam tape at home depot and loosened the bolts of the door panel. I then stuffed the gasket material between the panel and door and tightened the bolts back up. This seems to be working so far but we have not had any really hard rain.
 
#6 ·
This is exactly what happened on my car. The dealership replaced the window regulator (twice) under warranty and the 1st time they didn't put the door seals back correctly. Water started leaking in when it was raining, and the dealership couldn't figure it out. They replaced the pollen filter/gasket, cleaned the sunroof, nothing could be found. One day I noticed the water puddle on the door sill and I put it together. Had the seal replaced and all good since then. Of course when they replaced the seal, they ripped the leather insert on the door panel. :banghead: Sometimes it seems like I come out of the dealership with more problems than I went in with.
 
#8 ·
I had some minor leaking around the base of the cabin filter tray. In case anyone missed it, I'll repeat...you must remove the entire cabin air filter housing to properly repair this (it wasn't hard if you ask me). In order to do it, you must remove the windsheild wipers and the cowl (the plastic trim at the base of the windsheild). There are nuts under caps that hold the wiper arms on splined shafts driven by the wiper motor. Use tape to mark the position of the wipers on the windsheild, pry the caps off with a small screwdriver, and unbolt the wiper arms. It may take a good tug to free the wiper arm from the splined shaft. With the wiper arms removed, remove two clips and one philips-head screw and the cowl can be lifted straight up in relation to the ground. It seals with a metal lip under it sort of like a zip-lock baggie would only with a little more strength. My advice is start at one edge and/or the other and work toward the center. Remove the cabin filter cover and the cabin filter. There are three small nuts that hold the bottom tray of the cabin filter housing (VW calls it a frame). The two of these closest to the fender/hood hinge may be difficult to get to unless you have some tight access 1/4" drive tools. Once unfastened, lift out the frame and you will see a bunch of debris and two seals underneath. The innermost seal is not at issue...its an airflow seal for the proper function of the air handling system. The outermost seal is some sort of closed cell foam and mine was actually torn from the factory and was also installed crooked. I chose to replace it with some strip Dum Dum (weatherstripping from a body shop). Any proper weatherstip of the appropriate size that can be made into a continuous loop should do the trick. Getting the right size and not having a gap are the keys. This "Dum Dum" that I used was similar to modeling clay, so it won't harden and it can be formed and connected, yet it doesn't sag or shrink.

Best of luck...and keep the cowl clean. Your vigilence will be rewarded by a lack of costly leaks.
 
#10 ·
I also am having this issue. Last weekend I removed the door card, unscrewed the metal panel inside the door layed a bead of silicone all along the bottom and re tightened everything. YES, I thought I'm a DIY god!
Well it turns out that I'm not. It rained heavily yesterday and I now have a wet smelly car again and it's defo coming from the door. (Already fixed disconnected sunroof drain).

Jeffe - if you look for posts on ambient lighting there's a guide on how to remove the door card to get to the gasket.
 
#12 ·
I also am having this issue. Last weekend I removed the door card, unscrewed the metal panel inside the door layed a bead of silicone all along the bottom and re tightened everything. YES, I thought I'm a DIY god!
Well it turns out that I'm not. It rained heavily yesterday and I now have a wet smelly car again and it's defo coming from the door. (Already fixed disconnected sunroof drain).
Bunce, have you ever had the success of re-sealing the inner metal panel (window regulator seal)? If you did, can you share your tricks on this? What kind of sealant you were using? Thanks in advance!
 
#16 ·
Thanks for the info bunce! I'll apply the seal after this cold front leaves. Can't imagine I can do it today at 22F in Texas (OK, I'm exaggerating a bit, but it was our low this morning and the winter is still 11 days away…). And even if I can do it, I don't know these VW plastics can hold without breaking under this low temperature.
 
G
#17 ·
Only cause I, too, thought of myself a DIY god after glueing a cowl that had a crack in it that was directly above the pollen filter housing (ie water funel down to the rear right passanger footwell). After hours of rain driving last night, I found the footwell getting wet again, but this time from the rear forward, as if coming in from the side. In my case the car's frame seal for the door (not the door itself) looks like the culprit, as its wet when peeled back at both the first 3 to 5 inches down along the B-pillar and at the base of the door sill. The driver's side was dry. There's actually a small rain hole right in the seal, near the top, before it travels down along the b-pillar. In the case of the drivers side its up top. On the passenger side its almost a foot down. Go figure.

Should one use dual spray adhessive (contact cement), or silicone when re-glueing door seals? Thx.
 
#19 ·
I finally had a chance to work on this water leak problem on the right rear door yesterday since the weather was warmer. It was a little bit more difficult than I though. I thought I could just loose the 7 bolts, pull out the inner metal panel/window regular (assembly carrier in Bentley), apply the silicon around the edge, and put the panel back. After several failed attempts of trying to pry loose the panel, I checked the Bentley and found out it is not that easy. The Bentley said I have to mess around the power window spreader pin/plug and door lock before I can pull the assembly carrier so I decided to give up my original idea. I then used the plastic tool to fry up the lower panel edge as much as I could and applied the silicon around it. I only applied about 1/3 of the panel edge on the lower side and I gave up of applying the rest of the edge. I waited until this morning and dumped some water and make sure there is no more water seeping through the seal at the lower edge like before. But I know the true test may have to wait until next spring when it rains.

I used a whole tube of Permatex clear RTV silicon adhesive sealant got from WalMart. I tried to get something from VW dealer but they said the seal comes with the whole assemble carrier (minus power window motor, part # 3B5 839 461 A) and the cost is $187.00!
 
G
#20 ·
VW has mailed a suplement to the Passat manual:

"Front sun roof drains: Open sunroof to check front water drains and clean if necessary"

"For 1998 to 2005 Passat and Passaat Wagon:
first after 40,000 and thereafter every 40,000 miles or 2 years whicever occurs first - Plenum Panel: Remover cover for plenum panel to check water drains and clean if necessary."

My own update is that indeed the nipples in the crease of the front door, near the hinges, need to be flushed from above. I had an inch + of sediment build up, which others have noted. I also have a much slower leak still coming in from the door seal, not the panel of the door or door itself (which I've already resealed). The water appears to come down around the seal and accumulate enough to leak down the inner sill.

The action above was the result of a class action lawsuit, probably from the poor owners who've lunched their computer brains in the automatics.
 
#21 ·
VW has mailed a suplement to the Passat manual:
"Front sun roof drains: Open sunroof to check front water drains and clean if necessary"
"For 1998 to 2005 Passat and Passaat Wagon:
first after 40,000 and thereafter every 40,000 miles or 2 years whicever occurs first - Plenum Panel: Remover cover for plenum panel to check water drains and clean if necessary."
Yeah, VW conveniently ignored the rear sunroof drains which are a lot harder to clean. You need to take out either the rear wheelhouse liner or the rear bumper cover to clean it which is PITA to do. The class action also does not include very common leaking problem from the failed seal on window regulator/assembly carrier.

My own update is that indeed the nipples in the crease of the front door, near the hinges, need to be flushed from above. I had an inch + of sediment build up, which others have noted. I also have a much slower leak still coming in from the door seal, not the panel of the door or door itself (which I've already resealed). The water appears to come down around the seal and accumulate enough to leak down the inner sill.
If you had sealed at least the bottom half of the metal window regulator/assembly carrier by lifting it up a little and squeezing the seal into the gap, you should not have any leaks from this area. You may need to check the 4 drain holes at the bottom edge of the door to make sure they are not clogged.
 
#22 ·
Adding the proper sealing material to an old thread..

Thanks for your post on this.
After removing/installing the inner door panel to repair a door lock, mine started to leak.
Took it apart yesterday to inspect and found the lower half of the seal around the panel to be deteriorated.

Did some research to find the proper sealing material for anyone else the might be interested.
It's a 3M product called Strip-Calk, P/N 08578.

3M Strip Caulk link

It's also known in the industry as Dumb Dumb.

I used a small chisel as a scraper to remove the old material. Get as much as you can then use gas on a rag to finish the rest.
If it's hot outside, put the new strips in fridge prior to installation. The stuff is pretty nasty to work with (rubbery tar like material).

I found it at my local O'Reily's auto parts (they will price match, saved me $8). Pretty sure Autozone & Advance Auto should have it.
Tell them to look for 3M 8578. They didn't find anything under 3M 08578.

Ken
 
#24 ·
Not too difficult to open the door up to work on.

Here's a good link with a "How to"..

Open Passat door panel

It was really a good write up someone made to repair the door lock actuator but will do the trick for you.
I removed all the old sealant around the door with and aluminum scraper then finished with gas on a rag.
Applying the new strips of "Dumb Dumb" was a trick in 85 degree heat.
I put the stuff in the freezer over night then kept it in the fridge between laying the strips out.
It comes in 12" strips. If you can keep it that length when removing from the wax paper then lay it in the groove, you'll be fine. Didn't take long at all after bringing it outside in the heat before it wanted to stretch and droop. The stuff is super sticky and can make a mess. Be real careful not to get it on the carpet..

Good luck, Ken
 
#27 ·
Can someone take pictures of where you're sealing up your doors?

From what I understand, water goes down between the glass window and the door itself, and it's supposed to drain out somewhere on the bottom.

I would love a picture of the door with the door card thing off and someone showing me where the water is supposed to be and where it isn't. And where you're doing these seals and how you know you're not just sealing all that water inside your door now.
 
#28 · (Edited)
Any water inside the door should drain out of the drain holes in the bottom of the door to the OUTSIDE of the door seal.
At least that's how the design is meant to work.
For my repair I didn't take the metal "card" off as it looked liked rivets needed to be drilled out etc, so I took a short cut!
After taking out the bolts (brass coloured in pic) I prised out the metal card from the door a little and got behind with a nozzle.
I siliconed between the metal card and the door around the bottom and both sides.
It came nicely oozing out when I tightened the bolts back up, smoothed off excess silicone with my finger as in pic below.
Don't overdo the silicone and block those drain holes!
It's never let any water in for years now.

Image
 
#30 ·
I had same problem and fixed with caulk as others have. Issue was only during heavy rains so assume the gasket was compromised and slow draining water dripped over weather seal at bottom of the door and flooded passenger foot well. Had issue on both passenger doors. Tested by spraying with a hose and have a had a few heavy rains... still dry! If I see an pooling when I open in the door in the future as in first post pic will repeat. Was not hating my car for a week and then the torque convert went....ugh
 
#32 ·
I have had all the leaks mentioned here with my 2001 wagon. First, CCM failed because of sunroof drain blocked. $1000 to replace and reprogram it. Stuck nipple. Clipped nipple crosswise using side-cutters, and check it periodically now. I also check drains periodically by pouring a little water on the closed sunroof to see if water comes out under the car where the drains are. Had water in rear footwell twice. First was same problem with drain. Removed fender liner and clipped nipple the same way. Then had water in rear footwell caused by the common leak from the cabin filter frame. Used silicone caulk to fix that. Lastly, had water coming from door leak. Took door apart and put ribbon caulk from a hardware store where seal had deteriorated after removing the seal material at the bottom. After doing that, realized that I could have sealed it by merely putting a bead of silicone around the aluminum door panel at the bottom without taking it apart. Problem with putting silicone inside this panel is that it will be very difficult to remove it if you have to remove it to repair window regulator or door lock. On the outside I would only need to cut the bead with a knife to remove the panel.