

Here’s a write up for taking the front door apart on a 2007 Passat 2.0T. I took the driver door apart, but I imagine the same steps would apply to working on the passenger door.
This write up is useful if you want to replace a window, door handle, door lock, door lock cylinder, window regulator, window regulator motor, subframe… pretty much anything behind your door trim.
All right, here we go.
1. First remove the door trim. To do that you need to:
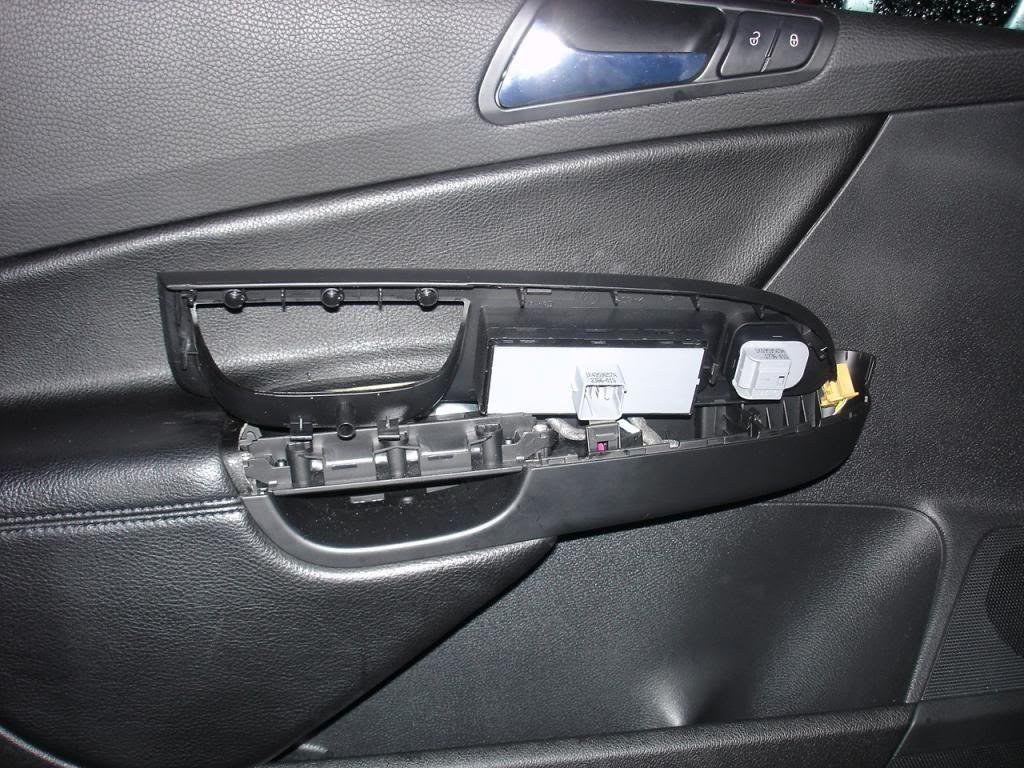
a) pry up the handle cover – I used a butterknife
b) disconnect two electrical connectors
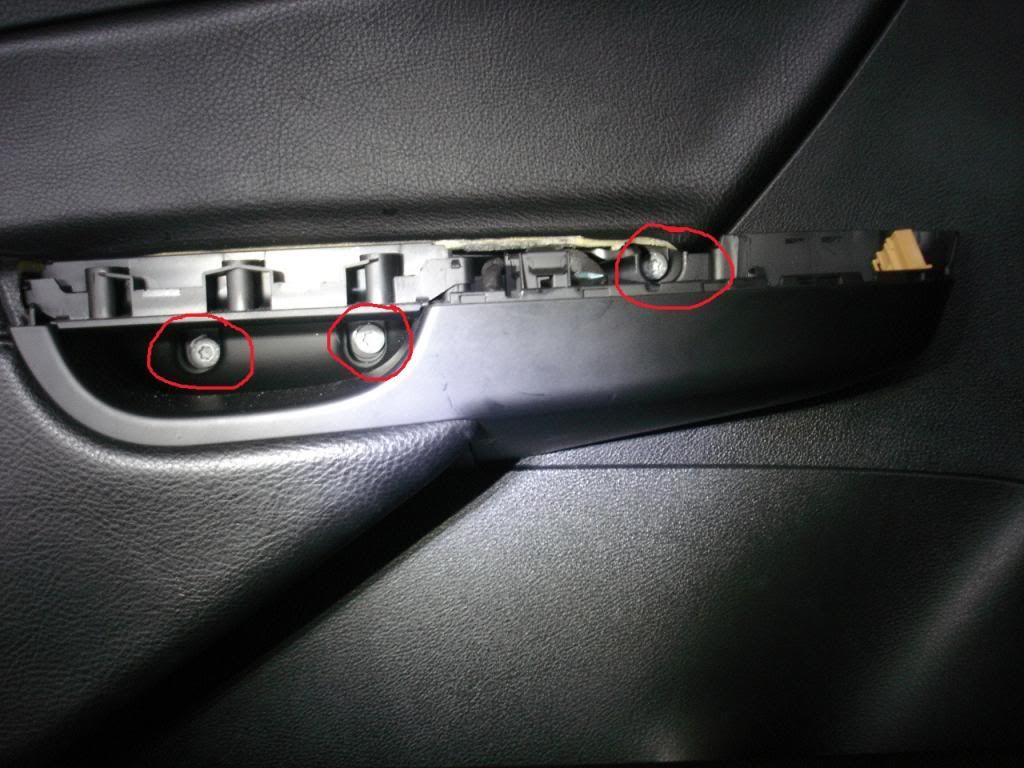
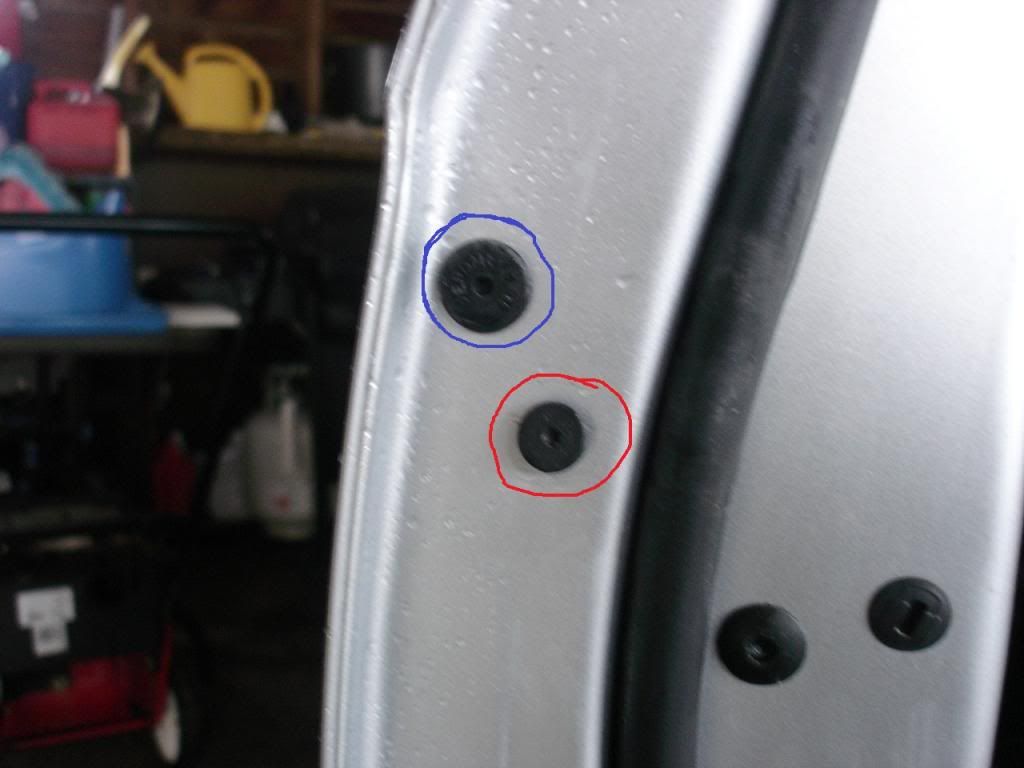
c) remove three T30 screws behind the door handle cover (red circles above), and two T20 screws at the bottom of the door panel trim (not shown)
d) Now you need to pull the trim off the door. There are six clips holding the trim to the door – 3 on each side. I used a butterknife to find them, and then I pulled the door trim off the door.
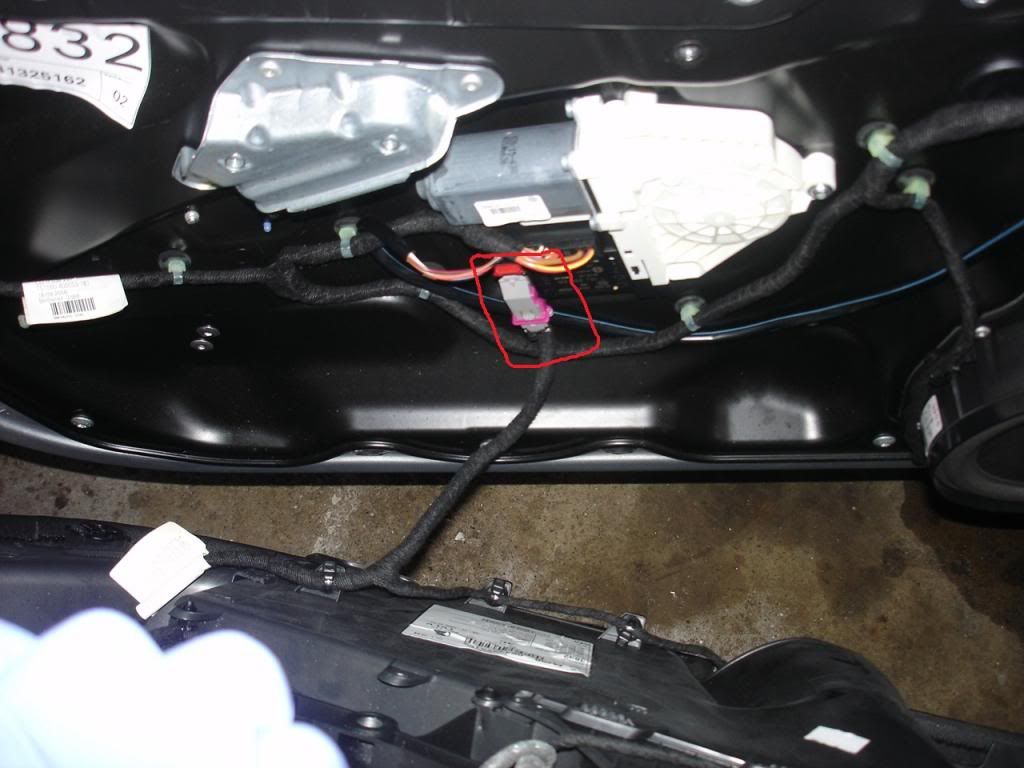
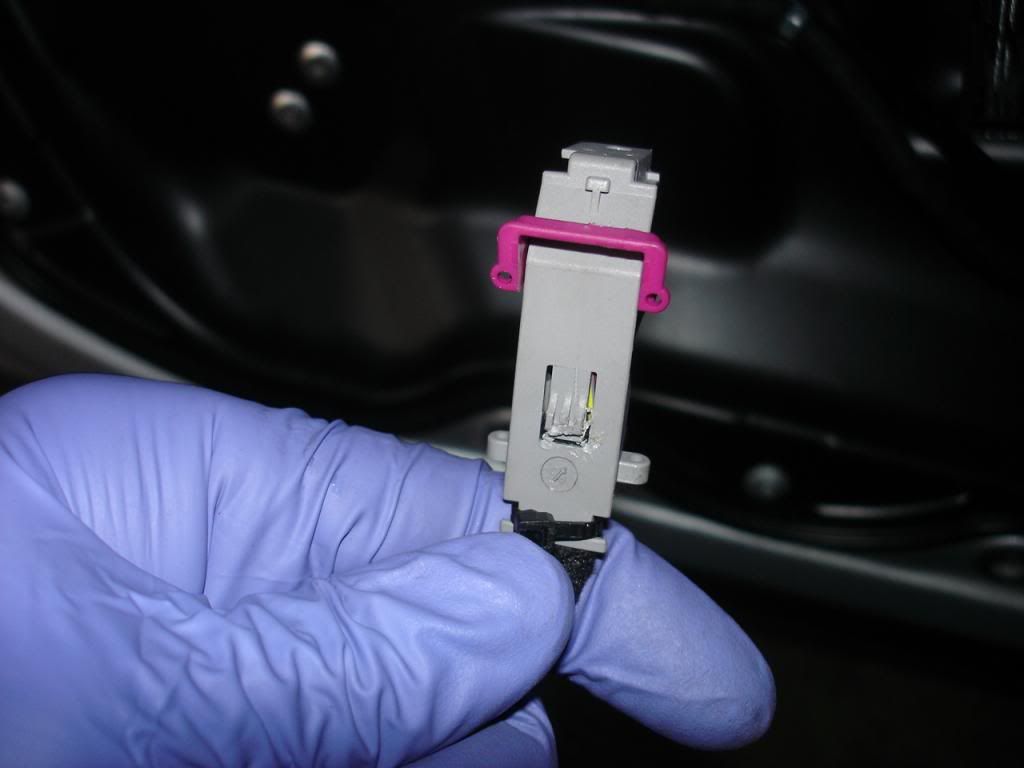
e) Disconnect the electrical connector circled in red above. To do it, just pry the purple clip up and it will come out.
f) Remove the door handle cable from the door handle. Be careful not to break the cable holding tabs as they are tiny.
g) The trim is now free and can be set aside.
2. Next, you need to remove the door handle and door lock cylinder.
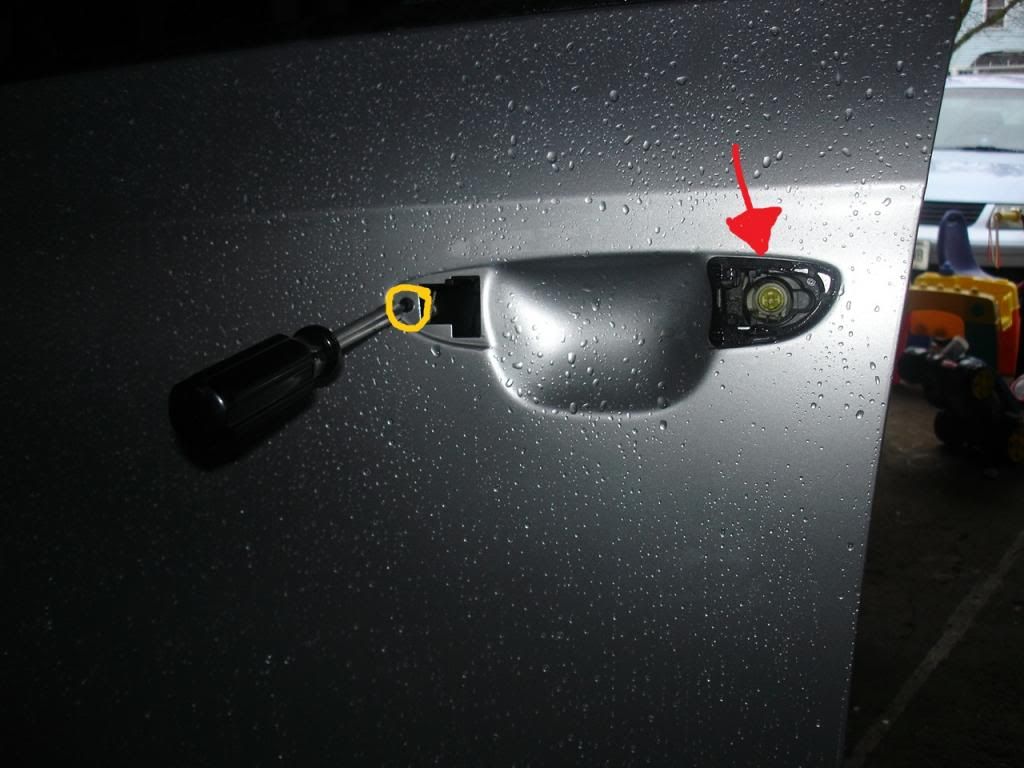
a) There are covercaps covering bolts circled in blue and red. Remove them.
b) Remove the bolt circled in RED (Torx T15) completely out. Read next very carefully.
c) Now go onto the bolt circled in BLUE (Torx T15). DO NOT REMOVE THIS BOLT COMPLETELY. Pull the door handle out and start loosening the bolt circled in blue. The door handle will be stuck in its pulled-out position once you turn that bolt loose a few turns, and DO NOT TRY TO PUSH IT IN.
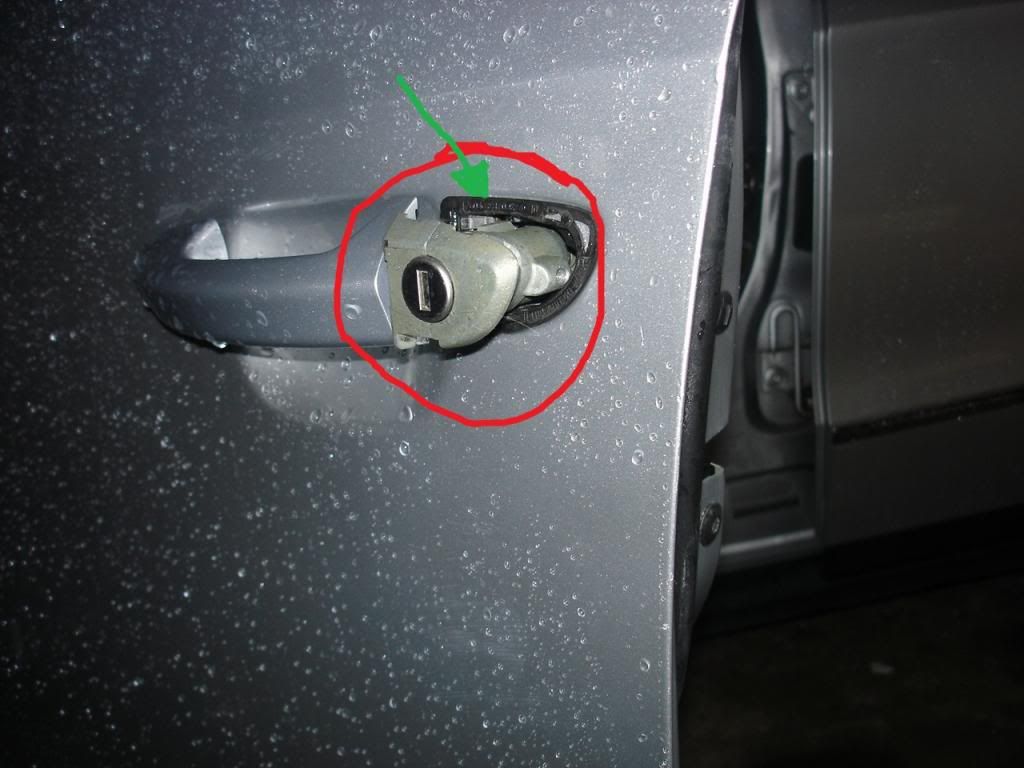
d) Keep slowly loosening the bolt circled in blue, while at the same time trying to pull the lock cylinder out. You can turn the bolt loose one turn, and then try to pull the cylinder out. Keep doing it until you can pull the cylinder out. Now I’ll say it again: DO NOT REMOVE THE BOLT CIRCLED IN BLUE COMPLETELY. Loosen it just enough so you can get the cylinder out.
e) Once the cylinder’s out, you can remove the door handle. To do so, you need to
3. Once the door handle and lock cylinder are out you can begin removing the subframe.
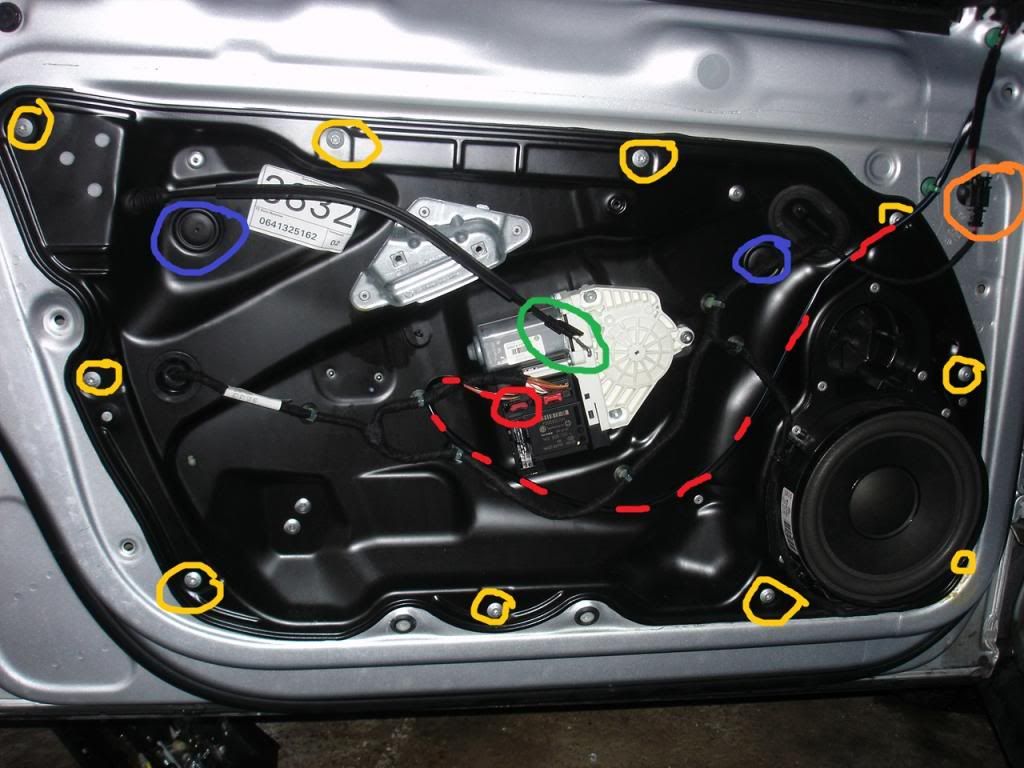
a) Pull the cover caps circled in blue off.
b) Now you need to lower the window. To lower it you have to reconnect the electrical connector from your door trim back to the window regulator. Lower the window until you can see the screws (you need E5 socket – they are “socket torx” screw for the lack of a better term) holding the window brackets tight. THESE SCREWS HAVE LEFT HAND THREADS. If you don’t know what it means (not trying to offend anybody), to loosen them you need to turn them clockwise, and to tighten them you need to turn them counterclockwise. Exactly the opposite of how things should be.
c) Once the screws are loose you can remove the window. If you are replacing the window, you can pull it out of the door frame now. If your goal is something else, have some duct tape handy. Pull the window up and tape if to the door window frame so it doesn’t fall down.
d) On window regulator, disconnect the side mirror electrical connector (circled in red) and guide the cable free and away from the subframe (red lines).
e) Disconnect the electrical connector circled in orange, and pull the clip holding the cable to the door out (orange circle).

f) Now you need to disconnect the main electrical harness from the door to the car. If you look at the place where your door meets the car you’ll see a rubber “snorkel” or protective boot. At the car side, the boot has two tabs. The bottom one is fixed. The upper one can be pushed up. So push the upper tab up and pull off the boot on the car side.
g) Once the boot’s off, pull the harness connector lock (clip) down and disconnect the harness from the car.
h) Push the boot and main harness connector (circled in red) into the door.

i) Remove the door lock bolts (2 M6 bolts)
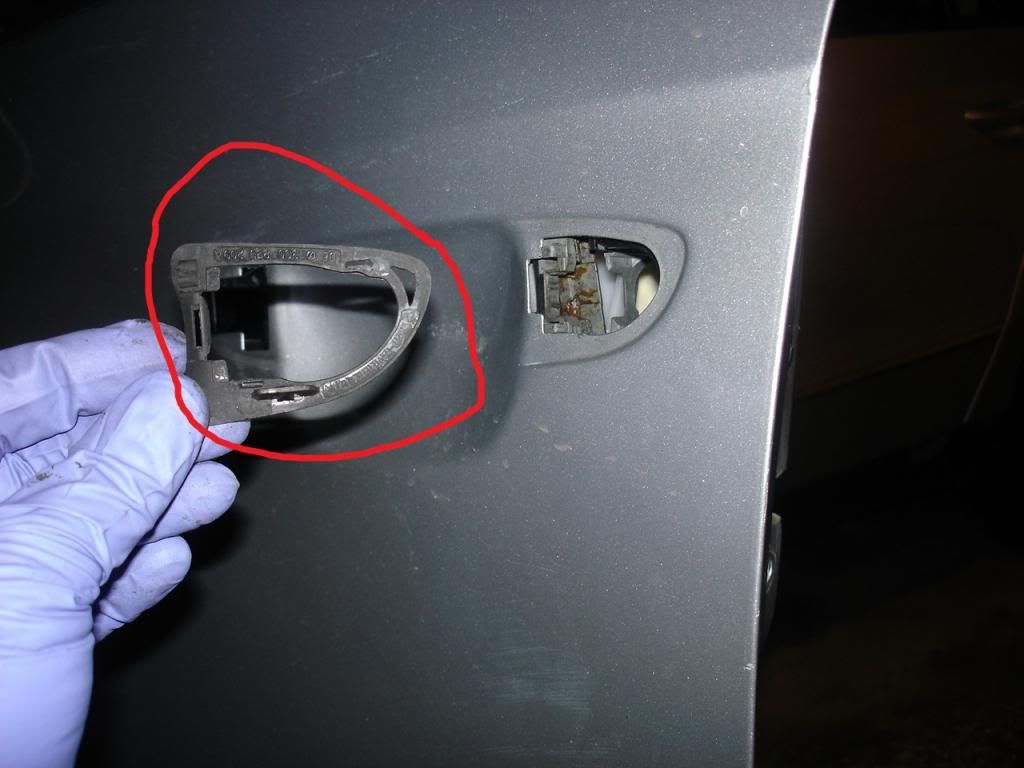
j) Remove screw circled in yellow (T20), and then pull of the door handle bracket “gasket” (red arrow). Pay attention to how it’s installed.
k) At this point you can remove all the bolts securing the subframe (subframe picture – yellow circles)
l) Make sure the door handle bracket is free from the door when you remove that “gasket” (red circle), and then pull the subframe up a little bit, tilt the bottom out, and pull it downwards out from the door frame.
Forgot to add that installation is reverse of removal. A couple points though:
1. When you guide the main harness through the door back out, make sure the door end is reseated right in the door frame. Then you bolt the subframe on. This way you don't find the harness being pulled into the door frame all of a sudden - which incidentally happened to me")
2. Note about the main harness - it is held by a clip to the subframe so that it stays out of the window downpath. If you accidentally break that clip so the harness has a lot of play and is loose, make sure you tie it in some way to the subframe so it doesn't swing out in the window down path
3. When you're ready to put the window down, slide the window brackets down a little bit so that you can actually see and make sure the window sits in the window brackets. Then push on the window down a little bit to seat it fully in the brackets. Then, raise the window electronically so you can access the bracket screws. This way you'll make sure the window is fully seated in the brackets.
4. With the main harness disconnected do not turn the car on, as an airbag warning will pop up - airbag side crash sensor is disconnected. If you have a means of resetting it it's fine.
Any suggestions, comments, etc. are welcome. Note, will take donations in BEER ONLY
This write up is useful if you want to replace a window, door handle, door lock, door lock cylinder, window regulator, window regulator motor, subframe… pretty much anything behind your door trim.
All right, here we go.

1. First remove the door trim. To do that you need to:
a) pry up the handle cover – I used a butterknife
b) disconnect two electrical connectors

c) remove three T30 screws behind the door handle cover (red circles above), and two T20 screws at the bottom of the door panel trim (not shown)
d) Now you need to pull the trim off the door. There are six clips holding the trim to the door – 3 on each side. I used a butterknife to find them, and then I pulled the door trim off the door.

e) Disconnect the electrical connector circled in red above. To do it, just pry the purple clip up and it will come out.

f) Remove the door handle cable from the door handle. Be careful not to break the cable holding tabs as they are tiny.
g) The trim is now free and can be set aside.
2. Next, you need to remove the door handle and door lock cylinder.

a) There are covercaps covering bolts circled in blue and red. Remove them.
b) Remove the bolt circled in RED (Torx T15) completely out. Read next very carefully.
c) Now go onto the bolt circled in BLUE (Torx T15). DO NOT REMOVE THIS BOLT COMPLETELY. Pull the door handle out and start loosening the bolt circled in blue. The door handle will be stuck in its pulled-out position once you turn that bolt loose a few turns, and DO NOT TRY TO PUSH IT IN.

d) Keep slowly loosening the bolt circled in blue, while at the same time trying to pull the lock cylinder out. You can turn the bolt loose one turn, and then try to pull the cylinder out. Keep doing it until you can pull the cylinder out. Now I’ll say it again: DO NOT REMOVE THE BOLT CIRCLED IN BLUE COMPLETELY. Loosen it just enough so you can get the cylinder out.
e) Once the cylinder’s out, you can remove the door handle. To do so, you need to
- Pull the door handle towards the rear of your car a little bit
- Then swivel it outside out of its bracket
- Remove it from the door
3. Once the door handle and lock cylinder are out you can begin removing the subframe.

a) Pull the cover caps circled in blue off.
b) Now you need to lower the window. To lower it you have to reconnect the electrical connector from your door trim back to the window regulator. Lower the window until you can see the screws (you need E5 socket – they are “socket torx” screw for the lack of a better term) holding the window brackets tight. THESE SCREWS HAVE LEFT HAND THREADS. If you don’t know what it means (not trying to offend anybody), to loosen them you need to turn them clockwise, and to tighten them you need to turn them counterclockwise. Exactly the opposite of how things should be.
c) Once the screws are loose you can remove the window. If you are replacing the window, you can pull it out of the door frame now. If your goal is something else, have some duct tape handy. Pull the window up and tape if to the door window frame so it doesn’t fall down.
d) On window regulator, disconnect the side mirror electrical connector (circled in red) and guide the cable free and away from the subframe (red lines).
e) Disconnect the electrical connector circled in orange, and pull the clip holding the cable to the door out (orange circle).


f) Now you need to disconnect the main electrical harness from the door to the car. If you look at the place where your door meets the car you’ll see a rubber “snorkel” or protective boot. At the car side, the boot has two tabs. The bottom one is fixed. The upper one can be pushed up. So push the upper tab up and pull off the boot on the car side.
g) Once the boot’s off, pull the harness connector lock (clip) down and disconnect the harness from the car.
h) Push the boot and main harness connector (circled in red) into the door.

i) Remove the door lock bolts (2 M6 bolts)

j) Remove screw circled in yellow (T20), and then pull of the door handle bracket “gasket” (red arrow). Pay attention to how it’s installed.
k) At this point you can remove all the bolts securing the subframe (subframe picture – yellow circles)

l) Make sure the door handle bracket is free from the door when you remove that “gasket” (red circle), and then pull the subframe up a little bit, tilt the bottom out, and pull it downwards out from the door frame.
Forgot to add that installation is reverse of removal. A couple points though:
1. When you guide the main harness through the door back out, make sure the door end is reseated right in the door frame. Then you bolt the subframe on. This way you don't find the harness being pulled into the door frame all of a sudden - which incidentally happened to me
2. Note about the main harness - it is held by a clip to the subframe so that it stays out of the window downpath. If you accidentally break that clip so the harness has a lot of play and is loose, make sure you tie it in some way to the subframe so it doesn't swing out in the window down path
3. When you're ready to put the window down, slide the window brackets down a little bit so that you can actually see and make sure the window sits in the window brackets. Then push on the window down a little bit to seat it fully in the brackets. Then, raise the window electronically so you can access the bracket screws. This way you'll make sure the window is fully seated in the brackets.
4. With the main harness disconnected do not turn the car on, as an airbag warning will pop up - airbag side crash sensor is disconnected. If you have a means of resetting it it's fine.
Any suggestions, comments, etc. are welcome. Note, will take donations in BEER ONLY


