I probably majorly over-engineered this, but with all this rain, I have had lots of indoor time.
:lightsaber:
Side view of fog light module removed from car:
![Image]()
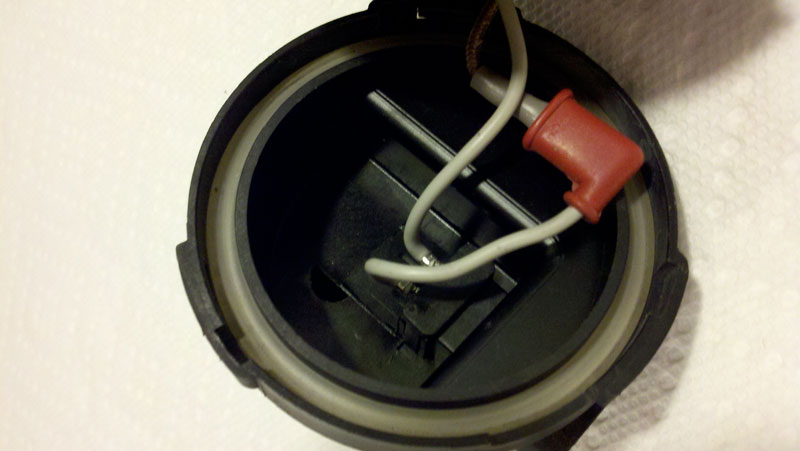
View of the fog light power plug socket and air vent located on back of cap:
![Image]()
Separating the cap from the housing body, the problem isn't obvious as yet.
![Image]()
The leads from the fog light power coupling look promising. Might have to clip one of them and add a female flag connector since plastic base of new HIDs is not grounded.
![Image]()
View with the OE halogen H3 bulb removed:
![Image]()
Side-by-side comparison of H3 OE halogen bulb (top) and H3 3000K HID bulb (bottom). First evidence that the height of the base is going to be a problem in the cramped housing cap.
![Image]()
With the screw terminal of the OE power wires disconnected, it is easier to see that the space needed for the base of the new HID bulb is presently occupied by the OE power coupling base:
![Image]()
View of the new H3 3000K HID bulb mounted in reflector base and secured with spring clips. Note the base protrudes a full 15mm further into housing cap than OE bulb base:
![Image]()
Better view of the HID bulb base clearance problem:
![Image]()
So I thought about it for a few minutes, and then I had a plan.
First step: using a fine-toothed saw (hacksaw, bandsaw, coping saw) I cut off the vent and the outer skirt of OE power coupling:
![Image]()
Second view of vent and power coupling skirt removed:
![Image]()
I then sanded the stumps of the power coupling skirt and vent to the surface level:
![Image]()
Once I had the stumps smoothed down flush(ish), I snipped the wires inside the housing cap:
![Image]()
Placing the housing cap open side down, I used a 1" hole saw to bore straight down through the top of the cap as close to the center as possible while still allowing for the square walls of the cap to remain intact. When I did this, the original power coupling base was sheared off at the same time:
![Image]()
I then snipped the male connector ends from the ballast power supply wires (blue and black wires with red insulated male connectors) that were located inside the rubber grommet:
![Image]()
Soaping up the remaining two wires will help the grommet slip up and down easily. Note the cap is attached to housing again in this photo, and it shows very well how the the height of the H3 HID bulb was a problem. When the grommet is put in place, the bulb base will wear it snugly like a hat:
![Image]()
With the wires soaped, I prepped the grommet to stay in place permanently by filling the gap between the inner and outer flanges all the way around with some gasket adhesive:
![Image]()
With the wires slippery, I slid the grommet down the wires and worked it into the new hole int he top of the cap:
![Image]()
A view of the grommet seated in the cap:
![Image]()
Side view of the vent cap and inner barrel as cut from the cap housing (center and right), with the other vent cap cut down 4mm in height (left) to use in new vent construction (cut down both caps by this measurement to keep the cap from completely sealing the inner barrel of the vent, thus preventing air flow):
![Image]()
View of two small holes bored side-by-side where vent inner barrel will be reattached:
![Image]()
Mixing up some plastic epoxy (or in this case, I used some J-B Weld I had on my bench) to reattach the vent inner barrel to the cap over the drilled vent holes:
![Image]()
With the vent inner barrel buttered with epoxy, reattach it to the cap over the new vent holes using a popsicle stick as a spacer to leave enough space for modified vent cap to eventually slide over:
![Image]()
View of the modified cap with the vent inner barrel reattached:
![Image]()
foglight_hid_37.jpg
Since the design of the original vent had an outer barrel making the path for water or any other contaminants indirect and therefore more difficult, I decided to skirt the modified vent cap with a piece of rubber from an old bicycle inner tube:
![Image]()
I ran the edges of the modified caps in the epoxy and then adhered a section if the rubber skirt, using some teflon thread tape to hold it fast while the epoxy set up:
![Image]()
Once the teflon thread tape was removed, the modified caps looked like this:
![Image]()
Oops! I made my skirts a little too short and not deep enough:
![Image]()
It was a happy accident though, as it turned out the new circumference of the modified cap fit snugly in a ring of the inner tube used to make skirt, so I cut a section and notched it at a couple of points near the outer edge of the housing for better airflow without a direct path to inner barrel opening, and ran a bead of gasket adhesive around the top edge:
![Image]()
View of the vent notches that flank the inner barrel opening:
![Image]()
The modified fog light housing are now complete. The two remaining wires through the grommet have plugs that attach to leads from the igniter. You can use some more gasket adhesive to seal the open holes on the top of the grommet where the removed wires were before, and to seal and water from finding its way in through the openings where the original power coupling leads entered the cap.
Next I had to attach new connecters to the removed leads from the grommet. I used shielded crimp-on connectors like this:
![Image]()
I crimped the male connectors on the leads to the ballast:
![Image]()
And I protected the leads with some heat shrink insulators:
![Image]()
I then moved outside, and put the female connectors on the orginal power supply wires (after snipping off the original power plug end):
![Image]()
I then connected the ballast leads to the original power supply wires, blue wire/red insulator to white/green stripe and black/black to brown wire (ground):
![Image]()
And to reduce any issues from water ingress, I wrapped these connections securely in electrical tape:
![Image]()
I cleaned a suitable smooth surface on the side of the steel support under the bumper mount with alcohol to get a strong bond with the 3M outdoor mounting tape I used to fasten the slim ballast for the HID bulb:
![Image]()
I then cleaned a suitable surface under the bumper frame mount with alcohol to get a strong bond with the 3M outdoor mounting tape I double-layered on back of igniter (double layered because surface on back of igniter is slightly concave). Once it was on, I tugged at it, and it isn't going anywhere:
![Image]()
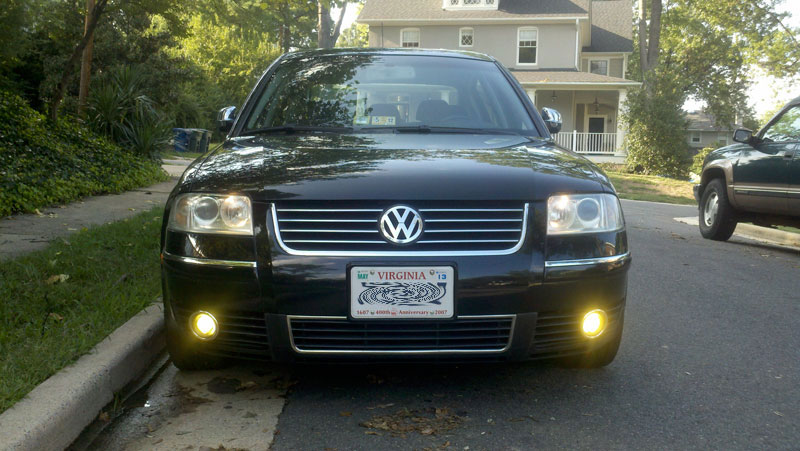
I installed the now modified housings after fastening all the remaining connectors and replaced the grilles and voila! Success!
With 4300K HIDs in Projectors:
![Image]()
With only city lights (Ziza white LED City Lights on the way from ECS):
![Image]()
:lightsaber:
Side view of fog light module removed from car:

View of the fog light power plug socket and air vent located on back of cap:

Separating the cap from the housing body, the problem isn't obvious as yet.

The leads from the fog light power coupling look promising. Might have to clip one of them and add a female flag connector since plastic base of new HIDs is not grounded.
View with the OE halogen H3 bulb removed:

Side-by-side comparison of H3 OE halogen bulb (top) and H3 3000K HID bulb (bottom). First evidence that the height of the base is going to be a problem in the cramped housing cap.

With the screw terminal of the OE power wires disconnected, it is easier to see that the space needed for the base of the new HID bulb is presently occupied by the OE power coupling base:

View of the new H3 3000K HID bulb mounted in reflector base and secured with spring clips. Note the base protrudes a full 15mm further into housing cap than OE bulb base:

Better view of the HID bulb base clearance problem:

So I thought about it for a few minutes, and then I had a plan.
First step: using a fine-toothed saw (hacksaw, bandsaw, coping saw) I cut off the vent and the outer skirt of OE power coupling:

Second view of vent and power coupling skirt removed:

I then sanded the stumps of the power coupling skirt and vent to the surface level:

Once I had the stumps smoothed down flush(ish), I snipped the wires inside the housing cap:

Placing the housing cap open side down, I used a 1" hole saw to bore straight down through the top of the cap as close to the center as possible while still allowing for the square walls of the cap to remain intact. When I did this, the original power coupling base was sheared off at the same time:

I then snipped the male connector ends from the ballast power supply wires (blue and black wires with red insulated male connectors) that were located inside the rubber grommet:

Soaping up the remaining two wires will help the grommet slip up and down easily. Note the cap is attached to housing again in this photo, and it shows very well how the the height of the H3 HID bulb was a problem. When the grommet is put in place, the bulb base will wear it snugly like a hat:

With the wires soaped, I prepped the grommet to stay in place permanently by filling the gap between the inner and outer flanges all the way around with some gasket adhesive:

With the wires slippery, I slid the grommet down the wires and worked it into the new hole int he top of the cap:

A view of the grommet seated in the cap:

Side view of the vent cap and inner barrel as cut from the cap housing (center and right), with the other vent cap cut down 4mm in height (left) to use in new vent construction (cut down both caps by this measurement to keep the cap from completely sealing the inner barrel of the vent, thus preventing air flow):

View of two small holes bored side-by-side where vent inner barrel will be reattached:

Mixing up some plastic epoxy (or in this case, I used some J-B Weld I had on my bench) to reattach the vent inner barrel to the cap over the drilled vent holes:

With the vent inner barrel buttered with epoxy, reattach it to the cap over the new vent holes using a popsicle stick as a spacer to leave enough space for modified vent cap to eventually slide over:

View of the modified cap with the vent inner barrel reattached:

foglight_hid_37.jpg
Since the design of the original vent had an outer barrel making the path for water or any other contaminants indirect and therefore more difficult, I decided to skirt the modified vent cap with a piece of rubber from an old bicycle inner tube:

I ran the edges of the modified caps in the epoxy and then adhered a section if the rubber skirt, using some teflon thread tape to hold it fast while the epoxy set up:

Once the teflon thread tape was removed, the modified caps looked like this:

Oops! I made my skirts a little too short and not deep enough:

It was a happy accident though, as it turned out the new circumference of the modified cap fit snugly in a ring of the inner tube used to make skirt, so I cut a section and notched it at a couple of points near the outer edge of the housing for better airflow without a direct path to inner barrel opening, and ran a bead of gasket adhesive around the top edge:

View of the vent notches that flank the inner barrel opening:

The modified fog light housing are now complete. The two remaining wires through the grommet have plugs that attach to leads from the igniter. You can use some more gasket adhesive to seal the open holes on the top of the grommet where the removed wires were before, and to seal and water from finding its way in through the openings where the original power coupling leads entered the cap.
Next I had to attach new connecters to the removed leads from the grommet. I used shielded crimp-on connectors like this:

I crimped the male connectors on the leads to the ballast:

And I protected the leads with some heat shrink insulators:

I then moved outside, and put the female connectors on the orginal power supply wires (after snipping off the original power plug end):

I then connected the ballast leads to the original power supply wires, blue wire/red insulator to white/green stripe and black/black to brown wire (ground):

And to reduce any issues from water ingress, I wrapped these connections securely in electrical tape:

I cleaned a suitable smooth surface on the side of the steel support under the bumper mount with alcohol to get a strong bond with the 3M outdoor mounting tape I used to fasten the slim ballast for the HID bulb:

I then cleaned a suitable surface under the bumper frame mount with alcohol to get a strong bond with the 3M outdoor mounting tape I double-layered on back of igniter (double layered because surface on back of igniter is slightly concave). Once it was on, I tugged at it, and it isn't going anywhere:

I installed the now modified housings after fastening all the remaining connectors and replaced the grilles and voila! Success!
With 4300K HIDs in Projectors:

With only city lights (Ziza white LED City Lights on the way from ECS):