

I replaced the fuel filter on my '98 V6 Passat. Took about an hour and was relatively painless.
Figured I'd do my first write up since the only one I could find was for a 1.8t and had NO pics (I like pics).
*Fuel filter should be replaced every 60K miles*
Keep in mind: I am not an expert (nor claim to be) and I hold no responsbility for when you work on your car. This write-up is only to help fellow DIY'ers. Gasoline if flammable and dangerous, so please be aware of your workspace.
What will you need?
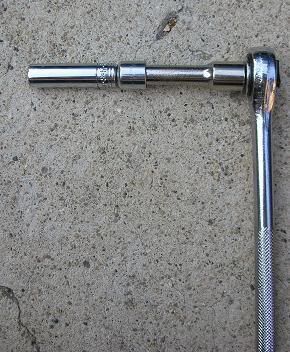
-10mm long socket
-Phillips Head Screw Driver
-OEM Fuel Filter
-Vice Grips and Rag
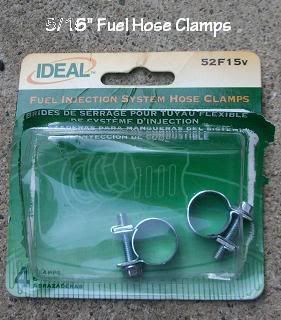
-5/16" fuel clamps (no holes!) (pic of mine are below)
-Sharp pair of pliers (or cutting tool)
-ramps (or jack stands)
Where to start?
1) Put the rear of your car on ramps (preferrably 2 piece ramps that come apart)
It will also help to have a cart with wheels to lie down on and to put jackstands as support.
![Image]()
![Image]()
2) Now look under the car at the torsion beam in the rear and you'll see a skid plate that stretches the width of the whole car.. That will have to come off for you to access the fuel filter. There are four 10mm bolts (that need a deep socket) and one phillips screw.
![Image]()
![Image]()
![Image]()
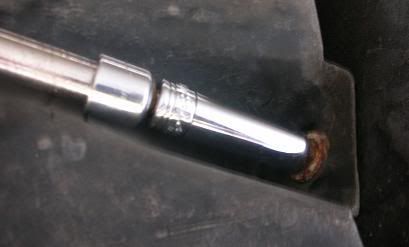
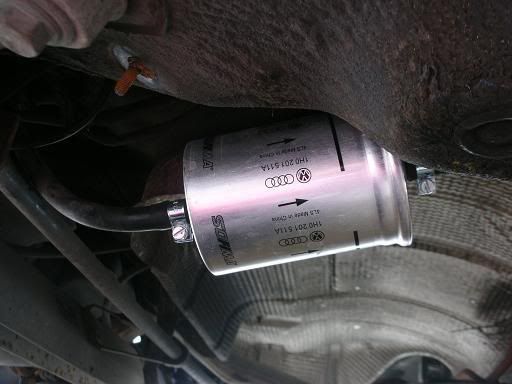
3) Once the cover is off, it's time to depressurize the system. Remove fuse #28 (little gas sign on your card) and crank the engine until it stalls. Crank it again for 3 seconds and you're done. Now go back under the car, you will be able to see the rusted fuel filter in front of the right rear wheel.
![Image]()
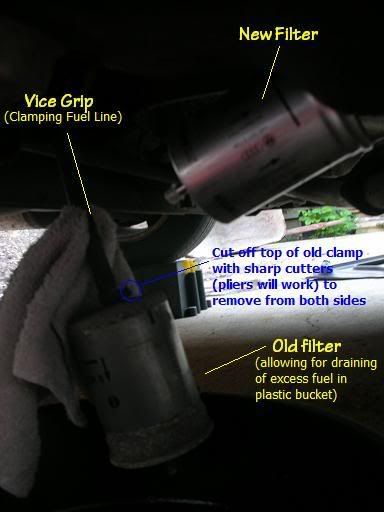
5) Remove the two bolts in the picture above and remove the clamp. The filter will hang freely now. Take your Vice Grips and clamp down the hose coming from the gas tank with a rag around the hose (to protect it).
![Image]()
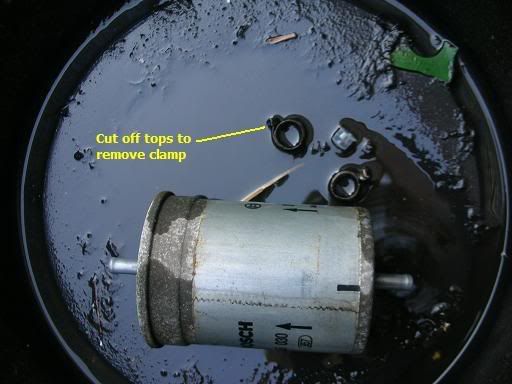
6) Now you want to take your Pliers (or sharp cutting tool) and cut the tops off the clamps. Do this slowly because you do not want to hurt the hose. Twist the hose off (with pliers if you need) and let the gas drain into a pan.
**You may want to wear latex gloves to avoid exposure to gasoline on skin**
Old filter and decapitated clamps:
![Image]()
New Clamps: (from pep-boys for 3 bucks...pack of 4)
![Image]()
7) Now install the new filter with the arrow going the same way (pointing towards front of car). Clamps should be TIGHT to prevent leaking. You won't hurt the hose if you bought the same clamps as I did.
![Image]()
8) Replace the #28 fuse and turn the key to the on position a couple of times (to try and repressurize the system). Start engine to see if there are any leaks (may stall, but will start up normal after a 2nd or 3rd attempt). Look back at the clamps on the fuel filter: If no leaks... then install bracket. If leaking then tighten more.
![Image]()
You can replace the 2" rubber fuel line (on the left), but mine looked fine.
9) Put back on skid plate and feel the clean fuel running through your cars veins...
This should be done every 60K miles. I waited till 90K and I had a clogged injector a few months ago. Using Fuel Injector Cleaner (like Techron) every 6-10K miles is a great way to keep your system clean.
Enjoy the write-up and I hope it helps people on future projects...
(Let me know if you have any questions)
Figured I'd do my first write up since the only one I could find was for a 1.8t and had NO pics (I like pics).
*Fuel filter should be replaced every 60K miles*
Keep in mind: I am not an expert (nor claim to be) and I hold no responsbility for when you work on your car. This write-up is only to help fellow DIY'ers. Gasoline if flammable and dangerous, so please be aware of your workspace.
What will you need?
-10mm long socket
-Phillips Head Screw Driver
-OEM Fuel Filter
-Vice Grips and Rag
-5/16" fuel clamps (no holes!) (pic of mine are below)
-Sharp pair of pliers (or cutting tool)
-ramps (or jack stands)
Where to start?
1) Put the rear of your car on ramps (preferrably 2 piece ramps that come apart)
It will also help to have a cart with wheels to lie down on and to put jackstands as support.


2) Now look under the car at the torsion beam in the rear and you'll see a skid plate that stretches the width of the whole car.. That will have to come off for you to access the fuel filter. There are four 10mm bolts (that need a deep socket) and one phillips screw.

3) Once the cover is off, it's time to depressurize the system. Remove fuse #28 (little gas sign on your card) and crank the engine until it stalls. Crank it again for 3 seconds and you're done. Now go back under the car, you will be able to see the rusted fuel filter in front of the right rear wheel.

5) Remove the two bolts in the picture above and remove the clamp. The filter will hang freely now. Take your Vice Grips and clamp down the hose coming from the gas tank with a rag around the hose (to protect it).
6) Now you want to take your Pliers (or sharp cutting tool) and cut the tops off the clamps. Do this slowly because you do not want to hurt the hose. Twist the hose off (with pliers if you need) and let the gas drain into a pan.
**You may want to wear latex gloves to avoid exposure to gasoline on skin**
Old filter and decapitated clamps:
New Clamps: (from pep-boys for 3 bucks...pack of 4)
7) Now install the new filter with the arrow going the same way (pointing towards front of car). Clamps should be TIGHT to prevent leaking. You won't hurt the hose if you bought the same clamps as I did.
8) Replace the #28 fuse and turn the key to the on position a couple of times (to try and repressurize the system). Start engine to see if there are any leaks (may stall, but will start up normal after a 2nd or 3rd attempt). Look back at the clamps on the fuel filter: If no leaks... then install bracket. If leaking then tighten more.
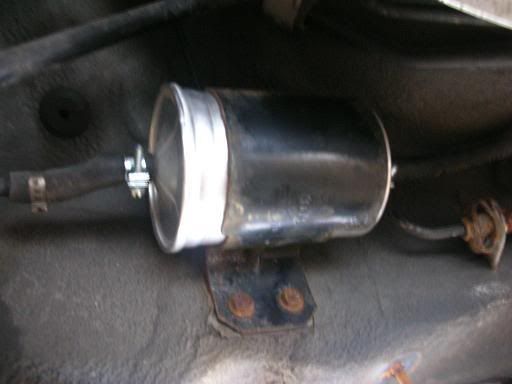
You can replace the 2" rubber fuel line (on the left), but mine looked fine.
9) Put back on skid plate and feel the clean fuel running through your cars veins...
This should be done every 60K miles. I waited till 90K and I had a clogged injector a few months ago. Using Fuel Injector Cleaner (like Techron) every 6-10K miles is a great way to keep your system clean.
Enjoy the write-up and I hope it helps people on future projects...
(Let me know if you have any questions)


